Posts

Showing posts from 2020

All I want for Christmas is my two front berths

Image
 The settee berths completed with removable slatted seats. We cut up some foam which we had to see how it would work on the berths; it was too high and too firm, so I found a supplier and will order the foam next year.  Businesses are closing for the season soon.  But work on the boat carries on.   The porthole sizes are finally decided upon and the stainless steel frames are made.  Then the frames are used as a cutting template for the rather difficult job of cutting out the portholes.  It made the cabin lighter and airier. The shelving units above the settee berths are made in White Ash and fitted.  The doors for the units will be made later.  

The Roof Begins

Image
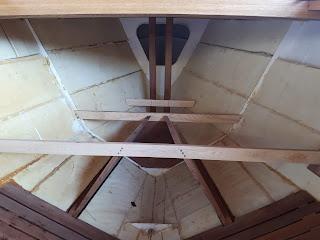
Roofing brings memories of roofing our house albeit this is a much smaller scale!   Shaping and fitting the White Ash beams now defining the shape of the cabin.  Summer has arrived and with it some heat waves.  We will leave off fitting the solid top just to keep it light and airy for now.  Next is the start of the interiors, with the forward bulkhead made in White Ash, and the settee berths made in Kiaat. Interior fitting. Forward bulkhead and settee berth Room Beams and Companion Way

Engine goes in

Image
 The water tank under the engine was painted with pond paint and the cover was sealed and fitted. Then the engine was lifted into place and bolted in.

The Controls

Image
 The cockpit floor was made off the boat, so much easier to do the Jeffries marine glue this time.  A treasured piece of Iroko was used to make the rudder and the bowsprit.  The rudder required some precise manufacturing and fitting of stainless steel straps and bolts, and it fitted, perfectly.  The messy job of glueing in the insulation inside the boat continued and finally sanding off the excess glue runs and painting the insulation with several coats of pva. Looking good. Rudder taking shape Starting the rudder Shaping the bowsprit Making the cockpit floor and sealing with the marine glue

The Prequel

Image
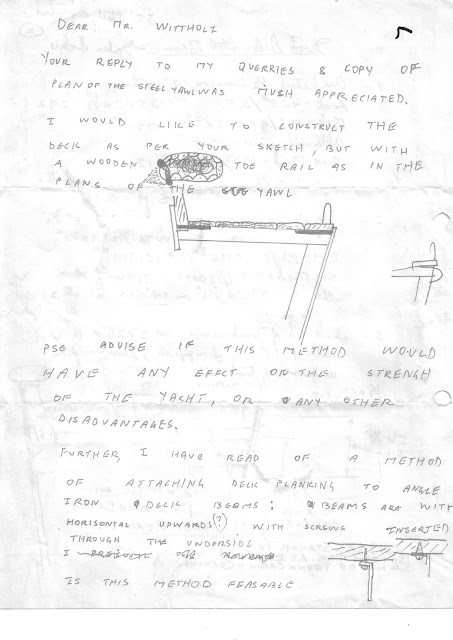
 Correspondence between the naval architect and John.

The beginning

Image
 The plans for our boat the Departure 35 were ordered and received in December 1986 from naval architect Charles Wittholz, USA.  John wanted a steel hull and a wood deck, so he began by going on a welding course, and it all started in the garage of a little house in Malvern.  When the structure needed more space we moved to a small farm in Grassmere.  There the 35ft framework took shape, John working weekends and evenings.  After a year of commuting to work in Johannesburg we decided to move, boat and all, to a plot in Olifantsvlei.  There from 1989, the steel sheets were added and time for the wood deck.  John needed to learn woodwork so he decided to learn by doing and made a few pieces of furniture.  Touch Wood Garden & Patio Accessories was born specialising in fine outdoor furniture, crafted to withstand the harsh South African weather (and possibly the sea!) Then we happened upon a lovely plot down the road which we decided to buy, and s...

Fitting the cabin sides

Image
The four posts for the cabin sides were accurately fitted while the sides were being steambent. Then the sides and front of cabin were in. Inside the insulation was slowly progressing.  We experimented with different glues to find the best method and our assistant Maxwell laboured on glueing and clamping the insulation boards in.  Our Yanmar engine arrived in July as the world eased trade restrictions.

Steam bending taken up a notch

Image
Work begins on the cabin sides which involve more steam bending.  In our 30 years of furniture making John has been stashing wood that he had plans for.  These beautiful supersized planks of Iroko will now form the cabin sides.  First the shaper had to be made.  When it came to clamping the steamed piece down, it was all hands on deck, including our Landy. Our Landy is needed to pull the clamps Steambending the cabin sides, Steven lending a hand We needed to clamp the steamed piece very quickly, Matthew helping

Toe the line

Image
The toe rail was made and fitted in June.  First the curved pieces of Iroko were steam bent to shape, then fitted on the outer edge of the deck, with shaping for the pullpit stantion plates and scuppers.  Varnishing with epoxy varnish then plascon sunproof sealed it.  Edge defined.

Glueing the deck

Image
South Africa has been in lockdown due to Covid-19 Coronavirus for the past 2 months but work on the boat continued.  First some welding and fitting of the tank covers in the keel, which will be water storage tanks.  Then an outlet for the water cooling for the engine was fitted.  The Yanmar engine was ordered before the world went into lockdown and the arrival of that will be delayed. So the messy job of glueing the deck was tackled.  First the joints are caulked using cotton string which is then hammered tightly into the seams.  Then a seam of Jeffries Marine Glue is applied.  This black tar-like glue needs to be heated to over 180 deg celcius and poured carefully into the joints.  We tried all sorts of devices and contraptions and finally settling on a kettle and a couple of heated chisels to clean up the glue. 

Glueing is a messy job

Image
The month of February spent fitting insulation inside the bow which involved experimenting with various glues, foam glues and contact adhesive.  Working in an incredibly small space (and it is only going to get worse) cutting and fitting and glueing insulation boards to the steel hull.  Very messy and very slow going, as each piece needed to be clamped down and dry for 24 hours.

Gorgeous curves

Image
Almost 3 months of fitting the kiaat decking.  Machining, shaping, laminating, fitting each piece.  The kiaat used is quartersawn which is highly stable.  The samson posts are fitted in the bow which will hold the mast and bow sprit.